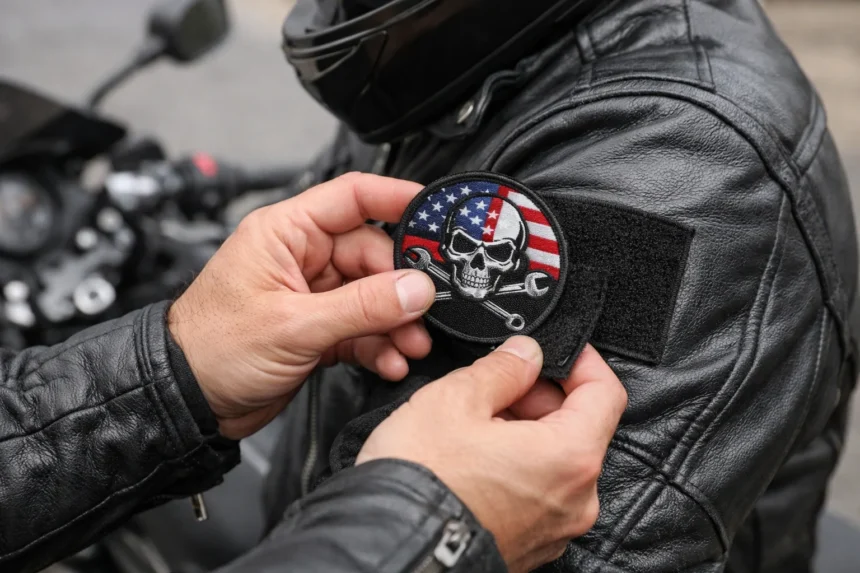
Adding patches to a leather motorcycle jacket is one of the most common ways riders personalize their gear. A patch can represent a riding event, brand, club, destination, personal interest, or simply add character to a jacket that has been worn for years. Leather, however, is very different from denim or ordinary fabric. Once a needle makes a hole in leather, that hole remains, which means placement, tools, stitch spacing, and preparation matter much more.
The safest way to sew patches onto a leather motorcycle jacket is to plan the position carefully, use a proper leather needle and strong thread, avoid unnecessary punctures, and keep the jacket lining and internal pockets in mind. Small patches can often be sewn by hand, while large back patches may be easier with an appropriate sewing machine. The goal is to attach the patch securely without damaging the leather, distorting the jacket, or creating rough stitching that becomes uncomfortable while riding.
Choose the Right Patch Before You Start
The type of patch affects how easily it can be attached to leather. Embroidered patches with a finished border are usually the easiest because the thick outer edge gives you a clear line for stitching. Woven patches can also work well, but thinner edges may require more careful stitch placement so the fabric does not fray or lift.
Before sewing, inspect the patch backing. Some patches have iron-on adhesive, plastic backing, hook-and-loop material, or a plain fabric rear surface. Even if a patch is labeled iron-on, heat alone is generally not the best attachment method for a leather motorcycle jacket because high temperatures can affect the leather’s finish and natural oils. Stitching around the border gives you a much more controlled and durable attachment.
Decide Exactly Where the Patch Should Go
Patch placement should be decided before the first needle hole is made. Put the jacket on, close the zipper, and look at where the patch sits relative to the chest, shoulders, sleeves, pockets, and back panels. A position that appears centered while the jacket is lying flat may look slightly different when the jacket is being worn.
For large back patches, use the seams and center line of the jacket as reference points. On leather motorcycle jackets, the center back panel is often the cleanest location because it provides a broad surface without interfering with sleeve movement. Chest patches usually work best above or beside pockets, while sleeve patches should be positioned where they will not be repeatedly folded at the elbow.
Check What Is Behind the Leather Panel
One of the most important steps is checking the inside of the jacket before sewing. A leather panel may have lining, insulation, armor pockets, interior storage pockets, seams, or reinforcement directly behind it. If you stitch without checking, you may accidentally sew an inside pocket shut or attach the lining in an uncomfortable position.
Reach inside the jacket and feel the area behind the planned patch. If possible, move the lining away so you are sewing only through the outer leather. Some jackets have an accessible lining seam that can be opened temporarily, allowing the patch to be stitched directly onto the leather and the lining to be closed again afterward. For complicated jackets with fixed linings, professional leather alteration may be safer.
Avoid Using Ordinary Straight Pins
Straight pins are useful when sewing fabric because the tiny holes usually disappear, but leather behaves differently. Every pin hole can remain visible, especially on smooth leather. Pinning and repositioning a patch several times may therefore leave a ring of unwanted marks around the final position.
Instead, hold the patch in place with low-tack fabric tape, small pieces of double-sided garment tape, or another temporary method suitable for the materials. Clips can sometimes help near edges, but they are not always practical in the middle of a jacket panel. The patch only needs enough temporary stability to prevent it from shifting while the first few stitches are made.
Use a Needle Designed for Leather
Leather requires a stronger and sharper needle than ordinary woven fabric. A leather or glover’s needle has a cutting-style point designed to pass through hide rather than forcing a blunt needle through the material. For hand sewing, the needle should be strong enough for the jacket leather but not so large that it creates oversized holes.
The correct needle size depends on leather thickness and patch construction. Lightweight leather may need a smaller needle, while heavy cowhide can require a stronger one. Avoid choosing the largest needle simply because the leather feels tough. The hole only needs to be large enough for the thread and stitch, not larger.
Choose Strong Thread That Will Hold Up
Thread matters because a motorcycle jacket experiences wind, movement, vibration, and repeated flexing. Ordinary lightweight sewing thread may break or wear through relatively quickly when used on leather.
Bonded nylon or strong polyester thread is commonly chosen because both provide good durability and abrasion resistance. Select a thread thickness appropriate for the patch border and needle. Matching the thread to the patch border creates a cleaner appearance, while contrasting thread can be used intentionally if you want the stitching to become part of the design.
Mark the Patch Position Before Sewing
Once you are confident about placement, mark a few reference points rather than drawing heavily on the leather. You can use removable leather-safe marking tools on suitable finishes, but always test them on an inconspicuous area first.
Another simple method is to place small pieces of low-tack tape at the top, bottom, and sides of the patch. These act as alignment guides if the patch moves while you are working. Large back patches benefit particularly from this approach because a small shift can make the entire design appear crooked once the jacket is worn.
Sew Close to the Patch Border
The stitch line should normally run close to the outer border of an embroidered patch. This keeps the edge securely attached and prevents the patch from curling or lifting over time. However, avoid stitching so close to the edge that the needle repeatedly slips outside the patch and makes unnecessary holes in the leather.
Keep stitch spacing as consistent as possible. Extremely tight stitches create many holes close together, which can weaken a narrow strip of leather. Widely spaced stitches, on the other hand, may allow the patch edge to lift. A balanced, even stitch pattern provides security without over-perforating the leather.
How to Hand Sew a Patch on Leather
Hand sewing is a practical method for small and medium patches because it gives you precise control over each needle hole. Start by positioning the patch securely and threading a leather needle with a strong thread. Tie or anchor the thread on the inside where the knot will not create an uncomfortable pressure point.
Push the needle through the leather and patch border carefully, then continue around the patch with consistent stitches. A thimble or leather sewing palm can make the process easier when working with thick material, but never force the needle toward your hand. Pull each stitch snug enough to hold the patch flat, but do not tighten so aggressively that the leather puckers around the edge.
Keep the Leather Flat While You Sew
Leather can distort if it is stretched while stitching. Lay the section of the jacket as flat as possible and support the surrounding material so the patch remains in its intended position.
As you move around the patch, check that the outer leather is not beginning to gather. If wrinkles develop around the stitch line, the thread may be too tight. Loosen your tension slightly and allow the patch to sit naturally against the jacket rather than trying to pull it tightly into the leather.
Be Careful With the Jacket Lining
If you are sewing through both leather and lining, check the interior frequently to make sure the lining is not twisted, folded, or being pulled tighter than the outer shell. A lining that is accidentally shortened by the stitches may tug against the jacket when you move your arms.
For a cleaner result, separating the lining from the outer leather is preferable when the jacket construction allows it. This keeps exterior patch stitching hidden from the inside and allows the lining to move independently. However, opening and resewing a quality jacket lining requires more skill, so a leather tailor is worth considering if you are unsure.
Sewing Large Back Patches Requires More Planning
Large back patches need extra care because even a small alignment error becomes obvious across a wide panel. Before sewing, put the jacket on and have someone check the patch position from behind. The design should sit straight in relation to the shoulders and center back rather than relying only on the jacket’s bottom hem as a reference.
A large patch also needs enough stitching around the entire perimeter to prevent the middle and edges from moving independently. If the patch has an irregular shape, follow its actual border rather than creating a simple rectangular stitch line. On mens leather biker jackets, large back panels often provide enough uninterrupted leather for these patches, but always confirm that vents, action panels, or internal pockets will not be affected.
Sewing Small Chest Patches
Small chest patches are usually easier to install, but pocket placement creates an important complication. A patch sewn over a chest pocket can accidentally close part of the pocket or make the opening difficult to use.
Check behind the patch location before every stitch and keep the pocket bag out of the way. If the patch sits directly above a zipper or snap, leave enough clearance so the pocket remains functional. Small patches look best when they follow the visual lines of the jacket rather than appearing randomly placed between seams and hardware.
Sewing Patches on Jacket Sleeves
Sleeves are more difficult because they are narrow and curved. The patch should be positioned where it will remain visible without sitting directly on the elbow crease or another high-flex area.
Place the jacket on your body and bend your arm before deciding on the final location. A patch positioned too close to the elbow may become repeatedly folded and can eventually lift along the border. Sleeve patches generally work better on the upper arm where the leather experiences less severe bending.
Can You Use a Sewing Machine on Leather?
A sewing machine can provide very clean results, especially for large patches, but not every household machine can handle motorcycle-grade leather. Thick cowhide combined with an embroidered patch can be difficult to feed evenly through a basic domestic machine.
Leather work is typically easier with a heavy-duty machine, leather needle, suitable thread, and a presser foot that allows the material to move smoothly. Walking-foot machines are particularly useful because they help feed multiple thick layers consistently. If the machine struggles, skips stitches, or requires excessive force, stop rather than risking damage to the jacket or equipment.
Do Not Use Too Much Glue
Temporary adhesive can help hold the patch in position, but it should not replace proper stitching unless the product and patch are specifically designed for permanent leather bonding. Excess glue may seep through embroidered material, leave stiff areas, or make later patch removal difficult.
If adhesive is used, apply only enough to stop the patch from shifting while sewing. Keep it away from the outer border where the needle will pass because hardened adhesive can make stitching more difficult. Tape or removable positioning products are often cleaner options for home installation.
Avoid Sewing Through Thick Seams
Existing jacket seams contain multiple layers of leather and may also include reinforcement tape or lining material. Trying to sew directly through them can require excessive force and create large, uneven needle holes.
Whenever possible, position the patch inside a clean leather panel rather than across major structural seams. If a design must overlap a seam, a professional leather machine may be needed. Keeping patches away from structural seams also helps preserve the jacket’s original construction and movement.
Finish the Thread Securely
When you reach the starting point, secure the thread carefully so the stitching does not loosen with use. Hand-sewn patches should have the thread anchored on the inside with a firm knot that is kept as flat as possible.
Trim excess thread without cutting too close to the knot. For machine stitching, backstitching may be used where appropriate, although the exact finishing method depends on the machine, thread, and patch. The important point is to prevent one loose stitch from gradually allowing the entire border to unravel.
Inspect the Patch After Sewing
Once the patch is attached, inspect both the exterior and interior of the jacket. Make sure the border lies flat, the leather has not puckered, the thread tension looks consistent, and all pockets and zippers still work properly.
Put the jacket on and move your arms through your normal riding position. The patch should remain flat and should not pull the leather in an uncomfortable direction. If you feel a knot, rough thread, or lining fold pressing against your body, correct it before wearing the jacket on a longer ride.
Can a Patch Be Removed Later?
Sewn patches can usually be removed, but the needle holes will remain in the leather. On dark or textured leather they may be less noticeable, while smooth or lightly finished leather can show them clearly.
This is why placement should be treated as relatively permanent. Before sewing a large patch, make sure you are comfortable with its position and appearance for the long term. Repeatedly attaching and removing patches from the same panel can leave visible perforation lines and weaken the surface.
When Should You Use a Professional Leather Tailor?
A professional is worth considering when the jacket is expensive, the leather is particularly thick, the patch is very large, or the placement involves a lining, pocket, structural seam, or complex back panel. Leather alteration requires different equipment and techniques from ordinary fabric sewing.
A specialist can open the lining, attach the patch directly to the leather, control stitch tension, and close the lining again so the interior remains clean. This is often the best solution for large center-back artwork, multiple coordinated patches, or jackets where you do not want visible stitching inside.
A Simple Patch-Sewing Checklist
Before making the first hole, check the full setup rather than focusing only on the patch itself. Careful preparation reduces the chance that you will need to remove stitches and create additional holes.
Use this checklist:
- Confirm the patch location while wearing the jacket.
- Check for pockets, seams, armor, and lining behind the area.
- Use a leather needle rather than a standard fabric needle.
- Choose strong nylon or polyester thread.
- Avoid ordinary pins that leave permanent holes.
- Keep stitches close to the patch border and evenly spaced.
- Do not pull the thread so tightly that the leather puckers.
- Keep large patches centered before sewing.
- Protect pocket openings and jacket hardware.
- Inspect the interior after the patch is attached.
Read more: Sew Patches on a Leather Motorcycle Jacket
Conclusion
Sewing a patch onto a leather motorcycle jacket requires more care than attaching one to ordinary fabric because every needle hole becomes part of the leather permanently. Good results begin with accurate placement, the correct leather needle, durable thread, controlled stitch spacing, and an understanding of what is behind the outer panel. The jacket’s lining, pockets, seams, zippers, and natural movement all need to be considered before stitching begins.
Small chest and upper-arm patches can often be sewn successfully by hand, while large back patches may benefit from a heavy-duty sewing machine or professional leather tailor. Whichever method you choose, avoid excessive glue, ordinary pins, extremely tight stitches, and structural seams whenever possible. A properly sewn patch should lie flat, remain secure during riding, and look as though it belongs on the jacket rather than being added as an afterthought.
For riders looking for quality leather jackets that can also be personalized with carefully selected patches, First MFG Co offers leather motorcycle styles for different riding preferences and looks. Visit our store to explore more jackets and find a design that can become a personalized part of your riding wardrobe.