Homes in California, Maryland sit in a humid, storm-prone pocket of Southern Maryland where summer air holds a lot of moisture, and heavy rains can quickly raise groundwater. That combination makes crawlspaces vulnerable to condensation, seepage, and slow damage that shows up as musty odors, cupping wood floors, or corroding HVAC components. Because the causes can vary from poor grading to venting that pulls warm, wet air inside, the smartest path is to identify what is happening in your crawlspace before deciding how to waterproof it. This guide focuses on concrete clues, regional causes, and practical fixes so you can match solutions like drainage, a vapor barrier, or full encapsulation to your actual conditions.
-
Early signs your crawlspace is taking on moisture
Start with what you can see and smell. Musty odors that get stronger after a rain, cupped or gapped hardwood flooring above the crawlspace, and visible mold on floor joists are classic red flags. In block or poured concrete foundation walls, look for efflorescence (white, powdery mineral stains) that mark past moisture movement. Rust on metal duct boots, sagging fiberglass batts hanging from joists, and puddles or a “tide line” on piers or vapor barrier edges all indicate elevated humidity or actual water intrusion.
Documenting these details helps professionals prioritize fixes. Take clear photos of standing water, deteriorated sill plates, or torn polyethylene liner seams, and note whether symptoms spike after thunderstorms or during peak summer humidity. When you’re ready to speak with a local crawlspace expert, including teams you can reach at brincefieldcs.com, those observations will speed an accurate assessment of whether you need drainage improvements, a heavier vapor barrier, dehumidification, or a comprehensive encapsulation.
-
Why California’s climate and site conditions drive these problems
In warm months, outside air around the Patuxent River corridor often holds more moisture than cooler crawlspace surfaces can tolerate. When foundation vents admit that air, it cools to its dew point on ductwork and joists, condensing into liquid water that feeds mold and wood decay. That is why a vented crawlspace can be wettest in summer, even without a single leak. The relationship is simple: warmer air holds more vapor, and when it cools under your home, it drops that water onto the first cool surface it reaches.
Bulk water is the other driver. Downspouts that dump beside the foundation, negative grading that slopes toward the house, and clogged or nonexistent footing drains raise hydrostatic pressure against foundation walls. After a tropical downpour, that pressure can push water through hairline cracks or under the footing and onto the crawlspace soil. Plumbing drips and uninsulated, sweating cold water lines add to the load, keeping humidity high enough for mold growth even on dry days.
-
A safe homeowner check to size up the situation.
Without crawling into tight spaces, you can learn a lot. During or right after a storm, walk the perimeter and watch how roof runoff moves. If splash blocks are buried, or downspouts discharge at the foundation, add extensions and clear obstructions. From the crawlspace hatch, use a flashlight to scan for standing water, waterlines on piers, or a liner that stops short of the walls. A simple hygrometer near the access door can reveal relative humidity trends and whether it regularly runs above the 60 percent threshold where mold thrives.
If entry is safe and you have protective gear (gloves, eye protection, and a P100 or N95 respirator), check a few details up close. Are vapor barrier seams overlapped and taped, or are there gaps around piers that vent soil moisture? Are rim joists uninsulated and leaky, allowing humid air in at the band board? Does fiberglass insulation feel damp or sag from the joists? Each finding helps align the fix: air sealing and dehumidification for condensation, drainage and sump pumping for groundwater, or both when conditions overlap.
-
From fixes to fit: drainage, vapor barriers, and encapsulation
Address bulk water first. Extend downspouts several feet away, reestablish soil slope so surface water sheds from the foundation, and consider a shallow swale to redirect runoff in low spots. Inside the crawlspace, a perforated perimeter drain (drain tile) routed to a sump pump with a check valve can relieve hydrostatic pressure and carry water to daylight. A battery-backup pump is a worthwhile add-on in storm-prone areas where power outages coincide with heavy rain, though it raises initial cost.
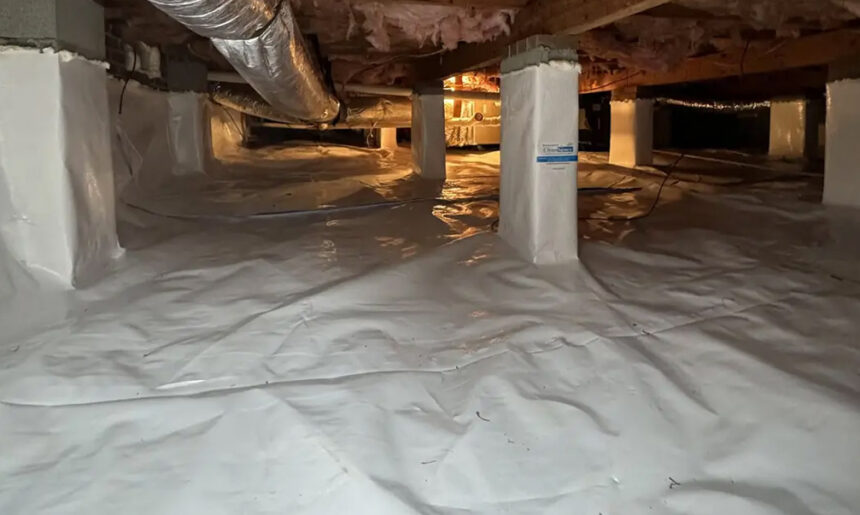
Once water is controlled, stop soil vapor. Thin 3– to 6-mil plastic tears easily and can trap moisture when seams open. A reinforced 10- to 12-mil polyethylene liner, installed wall to wall with sealed seams and wrapped around piers, dramatically reduces evaporation from the ground. In encapsulated systems, the liner extends up the foundation walls and is mechanically fastened with butyl tape or termination bars, then paired with sealed vents, rigid foam insulation at the rim joist, and a crawlspace dehumidifier that drains to the sump or a condensate line.
Choose the scope to match the risk. In a 1970s ranch a few miles from tidal wetlands, for example, persistent condensation on ductwork and recurring puddles after summer storms might justify a full encapsulation: interior drain tile, sump with backup, 12 mil liner sealed to the walls, closed vents, rim joist air sealing, and a dehumidifier set to maintain stable humidity. By contrast, a newer townhouse with dry soil but seasonal odors near the hatch could improve with exterior grading fixes, downspout extensions, and an upgraded, well-sealed liner.
Common mistakes to avoid include sealing vents without fixing drainage (which can trap water inside), laying plastic loosely without taped seams or wall terminations, and stuffing fiberglass into damp joist bays where it sags and molds. Another regional consideration is pest inspection: in termite country, leave a narrow, visible inspection gap at the top of the liner along the foundation wall so pest pros can spot shelter tubes. A knowledgeable installer will coordinate moisture control with inspection needs.
Post-repair monitoring that keeps humidity under control
Waterproofing isn’t a set-and-forget upgrade. Place a remote hygrometer sensor in the crawlspace and check readings seasonally. Keep relative humidity below about 60 percent to discourage mold growth and wood decay. Clean the dehumidifier filter as the manufacturer recommends, confirm the condensate or pump discharge is clear, and test the sump pump by filling the pit with water long enough to verify it works. Before winter, ensure discharge lines will not freeze shut; before hurricane season, make sure gutters are clean, and extensions are still in place.
Small habits protect your investment. After a major storm, quickly check the crawlspace access and liner for new tears, test the sump alarm if you have one)e, and feel for condensation on cold water lines. A homeowner in California, MD, who extended downspouts, added a shallow swale, and switched to a reinforced, taped liner often sees flooring stabilize and odors fade, provided a dehumidifier holds humidity in check. With layered solutions matched to clear evidence, crawlspace waterproofing becomes a targeted repair instead of a guessing game.