Storms off the lake, freeze-thaw cycles, and summer downpours can turn a small roofing flaw into a fast-moving emergency. If you live in or around Liverpool, New York, knowing what to do on the first day after sudden roof damage can limit structural harm and make permanent repairs easier. This step-by-step triage plan focuses on immediate safety, interior protection, and smart temporary fixes. It explains where water typically enters, how to stabilize problem areas without making things worse, and what decisions cannot wait. Use it as a practical checklist when leaks or wind damage strike, then follow up with a thorough repair plan once conditions are safe.
-
First Hour: Make the Home Safe and Stop Interior Damage
Start inside. Keep people clear of wet ceilings, and switch off power to any circuit serving lights or fans in the leak zone if you see flickering or moisture near fixtures. Catch drips with buckets, then protect floors and furniture with plastic sheeting. If a ceiling area is bulging, control the release by piercing the lowest point with a screwdriver into a bucket under close supervision. This reduces the chance of a sudden collapse. Open access to the attic if possible so humid air can dissipate, and photograph active leaks and wet insulation for insurance. If wind is still high or lightning is present, wait for safer conditions before going outside, and do not climb on a wet or icy roof.
Once people and interiors are stable, assess how fast water is entering. If it is pouring in or the roof structure looks compromised, call for professional help, such as emergency roofing services from Dynasty Roofing in Central New York. Immediate response is especially important when water is near the electrical panel, when a large section of shingles has blown off, or when you see significant sagging in the roof deck.
-
Exterior Triage When Conditions Allow: Tarping and Temporary Seals
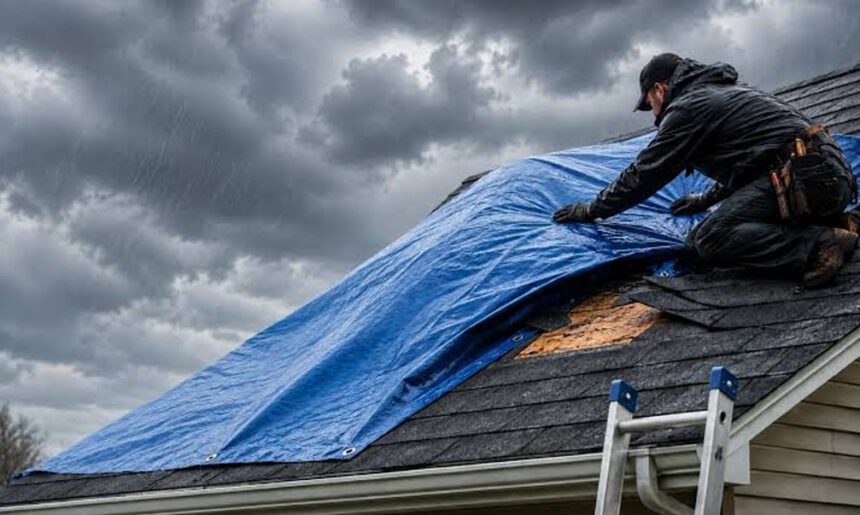
Only approach the exterior when wind has eased, and the surface is dry enough to stand. Wear slip-resistant footwear and use a harness on steep slopes. On asphalt shingle roofs, the most reliable temporary protection is a properly anchored tarp that runs from above the damage to the eave. Extend the tarp several feet past the hole, ideally over the ridge. Sandwich the tarp edge under 1×3 furring strips and fasten into rafters with screws to reduce new leaks, then add plastic cap nails along the edges. Where nailing is risky, weight the perimeter with sandbags. Avoid nailing through the middle of intact shingle courses, which creates new leak paths.
For small openings, a quick patch may buy time. Press butyl flashing tape beneath lifted shingle tabs to reseal them, and apply roofing cement sparingly around a cracked rubber vent boot. Reseal a loose storm collar on a metal flue with polyurethane or butyl, not household silicone, which often fails on wet or dusty surfaces. In valleys, inspect for torn valley flashing and avoid trapping water by incorrectly layering a tarp against the downhill flow. Metal and low slope roofs require different methods, so if you see standing water on a flat area or have a metal panel loosened at the seams, stop and call a pro rather than walking the surface.
-
Finding the Leak Path: Common Failure Points on Liverpool Roofs
Wind and freeze-thaw conditions often exploit specific weak points. Look for missing or cracked ridge cap shingles, which can let water ride the ridge vent and drop into the attic. Check step flashing along sidewalls where a dormer meets the roof; if sealant has failed or shingles lifted, wind-driven rain can slip behind the flashing and travel along the sheathing before appearing in a ceiling several feet away. Inspect valley flashing for punctures or debris dams. Examine rubber vent boots for splits and confirm that storm collars are snug. Around chimneys, worn counterflashing or gaps in mortar joints are common entry points. In winter, ice dams at the eave force meltwater under shingles and past the drip edge, soaking the soffit and the first course of underlayment. Remember that water follows framing; a leak at a vent boot may show up as a stain far from the pipe after running along rafters.
-
What Can Wait and What Cannot: Decision Rules on the First Day
Active leaks near electrical fixtures, heavy ceiling sags, and areas where shingles are missing down to the underlayment are urgent. Underlayment sheds water only for so long, and wind can drive rain uphill. A loose gutter or a single cracked shingle can usually wait until conditions improve. Temperature affects your options. Below about 40 degrees, asphalt shingles become brittle and may crack if lifted; seal strips also will not bond on their own. In heavy heat, roof cement skins over too fast to adhere well. Many mastics and tapes need a clean, dry substrate, so smearing sealant onto wet granules often fails. The tradeoff is time versus risk: a fast but poorly anchored tarp can act like a sail and tear off in the next gust, while a careful approach limited to interior mitigation might protect finishes until a safe, durable exterior patch is possible.
After the Patch: Document, Dry, and Plan Lasting Repairs
Photograph the damage, temporary measures, and any removed materials. Keep receipts for tarps, tapes, and labor. Start drying immediately with fans and a dehumidifier. In the attic, spread out or temporarily remove soaked fiberglass batts so the sheathing can dry; replace insulation that stays compressed after drying. Wipe down wet framing to remove dust that can harbor mold, and monitor moisture on the next rainy day to confirm the patch holds. Schedule a thorough inspection once weather permits, including a look at decking for delamination, underlayment condition, fastener pull-through, and all flashing details. If ice dams contributed, discuss ventilation and insulation adjustments, such as clearing soffit vents, verifying ridge vent airflow, and adding an ice and water barrier along the eaves during permanent repairs.
Emergencies reward calm, methodical steps. Stabilize people and interiors, control water at the source with a safe tarp or patch when possible, and document everything. Then plan permanent work that addresses both the symptom and the cause. A careful inspection may recommend replacing lifted ridge caps, renewing step and counterflashing at walls and chimneys, upgrading the drip edge at eaves, or extending ice and water shield to reduce ice dam risks. Treat the first 24 hours as triage to protect your home, and the following days as an opportunity to improve the roof’s defenses before the next storm arrives.